I always find that a bouquet of flowers can really brighten my day.
And while I'm a gardener and love flowers, real flowers only last for so long. But a stamped and watercolored bouquet lasts a lifetime. And each time your recipient looks at this card, it will give them the encouragement they need.
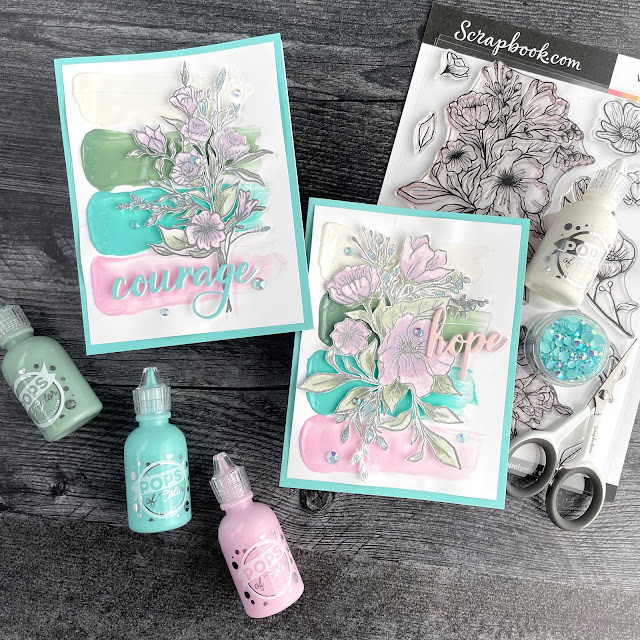
You know I'm all about the florals and I am so excited to share that Scrapbook.com's highly anticipated Wildflowers and Rose Blossoms stamp sets are now available! And today I'm sharing a set of encouraging cards using the Wildflowers stamp set along with their Feel Better Sentiments die set and Pops of Color!
For my color pallet, I chose pastel purple-pink, blue and green. I've got a full list of the supplies at the bottom of this blog post for you to shop and make your own version of these cards. And you can watch my Reel below for a quick video of the process!
To get started, trim down a bright white flat card front by a quarter inch on each side so that it can be matted over a piece of light blue smooth cardstock.
Next, place that white card front onto the Clearly Amazing Mat. This mat has a light grip and is perfect for holding things in place while you work on them, transfer detailed die cut letters and more. In this case, it will help keep my card front flat as the Pops of Color dries on it. Squirt a good dose of Pops of color in soft lavender, sky blue, sage green and white on the left side of the card front. Using a palette knife or silicone brush, gently spread the Pops of Color to the right.
While this is drying, stamp and emboss the Wildflower bouquets of your choice. I used both the large bouquets and embossed with Ranger's Super Fine Embossing Powder in silver. To watercolor these florals, you can use Distress Inks or Distress Ink Refills. I used the refills for concentrated color. I use the same watercolor techniques that I've shared previously right here on my blog and YouTube channel. For the refills, simply use one drop of watercolor. I get a little bit of that ink on a water brush marker and then give the brush a squeeze on my glass mat. I pick up a little bit more color and add it to that drop of water. This helps water down the concentrated color so I can work from light to dark. Each time, just add less water until you are working with the ink straight off your water brush marker!
Once you have let your watercolored florals dry a little, fussy cut them out. I've got a blog with tips for fussing cutting like a pro that will take the frustration out of fussy cutting. Peel your Pops of Color background off of the Clearly Amazing Mat once dry and mat it onto your light blue cardstock and a card base. I like to use the dotted roller adhesive because it is repositionable. Place some foam adhesive onto the back of your florals and then adhere it to the card.
For the sentiment, cut three of each word from the same Sherbet pad that the mat came from and adhere the layers together using liquid adhesive. This makes the word more sturdy for popping up with foam adhesive and adds more dimension. Add some thin strips of foam adhesive to the back of your word and pop them on your card! For a finishing sparkly touch, add a few gems.
Shop the Supplies:
Scrapbook.com
I am an affiliate with Scrapbook.com. When you shop the links below, I receive a small commission from the affiliate, at no additional cost to you. This helps me balance the costs of the time and love I put into my projects and blog so I can continue to share my ideas with you for FREE. If you shop the links, thank you! I greatly appreciate it.
Below are products that I used for this project.














0 comments
I'd love to hear your thoughts!