
Bloom Bundle: Floral Thank You Card + Inset Die Plate Trick
Plate dies are so much fun for the detail that they hold. And you can do a few different things with all of the offcuts!

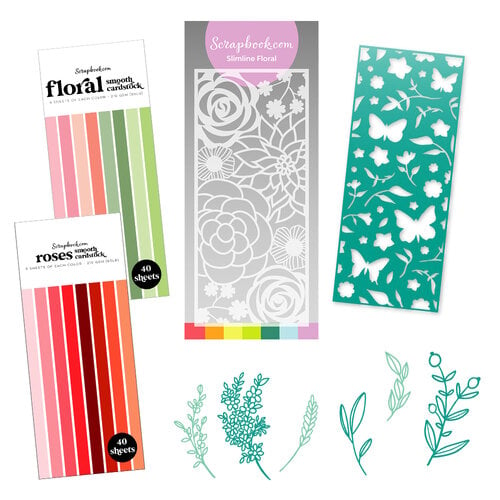
One way to use your offcuts from a die like this one, the Spring Floral die which is currently a part of Scrapbook.com’s Bloom Bundle livestream deal, is to use them in a shaker card like confetti. Another way is to inset them back into the negative space. I chose to do the latter for this one.

Before we get to the die, stamp out your sentiment first onto some white cardstock. I used the Card Maker Essentials stamp and Distress Oxide in saltwater taffy. Trim down your sentiment.

I chose to cut this plate die out several times to get a few different colors to work with. Select a green, pink and coral from the Floral slimline pad, also part of the Bloom Bundle deal. Then cut the die from some white cardstock or a slimline flat card front for the main background as well as the pink and coral. Trim down the white by a 1/8 inch on each side and adhere it to the green cardstock with Smart Glue.

To make gluing all these offcuts in place easier, there is a neat trick using Scrapbook.com’s Clearly Amazing Mat. Start by placing all of your pink and coral offcuts back into the negative spaces of the flowers and butterflies, without glue and leaving some of the larger flowers empty for the time being. I used coral for the stemmed flowers and pink for the blossoms only and the bottom layer of the butterflies. I also trimmed my offcuts along the edges to match with the edge of the white layer—but this step is optional.

Using the Clearly Amazing Mat, turn it sticky side down onto your card front and press and smooth it onto your loose cuts. Peel it up and all of your offcuts should be stuck to the mat. Apply Smart Glue to the backs of your offcuts on the mat, line the mat back up and press your offcuts back into place. Give it a few seconds for your glue to take hold and then slowly begin to peel back your Clearly Amazing Mat. Your offcuts should stick to your card as you peel the mat off.

Adhere your sentiment in place with a bit of foam adhesive. I made sure that it didn’t cover any of the butterflies significantly. For the larger flowers, layer some of the smaller offcuts that you didn’t use on them as a flower center. Add a small foam square to the back of each and place it into the corresponding negative space.

Next, add the coral top layer onto your butterflies by adding a small line of Smart Glue to the center of your butterflies and press it down on top. Once the glue is dry, gently fold the wings up. For a finishing touch, glue a gem to the center of each butterfly and to most of your popped up flowers. Then using the Dotted Adhesive, adhere your card to a card base.
Using the Clearly Amazing Mat just makes this process of gluing fiddly bits in so much easier and faster! Hope you loved this tutorial. And don’t forget to head over to Scrapbook.com to pick up the Bloom Bundle while supplies last. You Get this die plate, the Sprigs die, plus two pads of cardstock! Until next time, happy crafting!
Adrienne
Shop the Supplies:
Scrapbook.com
I am an affiliate with Scrapbook.com. When you shop the links below, I receive a small commission from the affiliate, at no additional cost to you. This helps me balance the costs of the time and love I put into my projects and blog so I can continue to share my ideas with you for FREE. If you shop the links, thank you! I greatly appreciate it.
Below are products that I used for this project.


2 comments
Beautiful card!!.Beautiful colors you used. Love how you made this card.
ReplyDeleteThank you!
DeleteI'd love to hear your thoughts!