How to Take Amazing Photos of Your Craft Projects: Part 5 - Editing
Once I figured out how to take great photos of my craft projects, fine tuning the images became quick and easy.
Welcome to the fifth and final installment in my mini series on how to capture amazing photos of your craft projects. Whether you just want to share your ideas with the world or you want to sell your makes, these tips will help you capture people's attention. Be sure to check out any of the four previous posts that you may have missed, including my tips on selecting a great background, how to set up the elements and photo props for your images, tips on setting up your lighting and tips on using your camera.
Let's just jump right into my final tips when it comes to editing your photos. If you have lit your images well, you should only need some fine tuning in a photo editing app. First, let's talk about the main two adjustments you might find yourself doing and then we'll go over the couple of options when it comes to apps for editing your photos.
Two Main Adjustments
In this part, I'll go over what will need correcting in post. Then in the section on apps, I'll go over the tools you'll use to make these adjustments.
Exposure
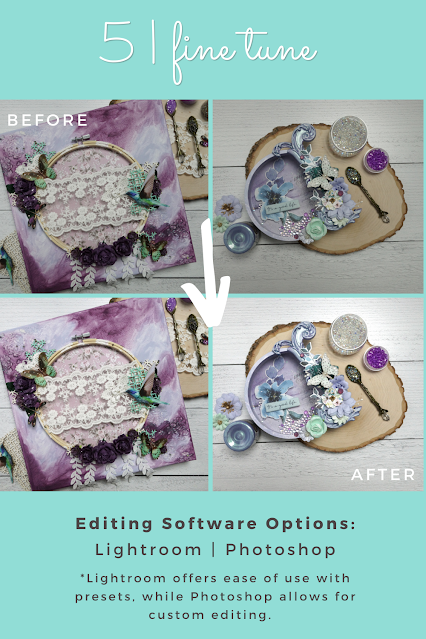
In my blog of tips on using your camera, I said that it is important that you set your exposure on your camera (DSLR or phone camera) to slightly lower than what you want the final photo to be. This is because a camera will lose pixel data on the parts of the photo that is "overblown," meaning it will just register as flat white in the most extreme cases. And you'll never be able to get that detail back if the camera never stored that information to begin with. This means that you'll need to adjust the exposure in editing to brighten up your photos a tad.
Color Correction
For the most part, you may not need to adjust this--especially if you set up your lighting well and eliminated all light not coming from your one and only light source to illuminate your photo. However I have found that there is one color in particular that is difficult to photograph, and this is purple. Cameras detect this color a bit differently than the human eye does and it either shows up as too red or too blue. A slight adjustment in a photo editing app can correct this problem.
Apps
Photoshop
Adobe Photoshop is what I personally use. It's a powerful tool that really lets you get in and adjust the details of your photo. It will even let you add text or watermarks to really amp up your photo editing game. It can be used on a desktop, laptop and certain tablets.
If you are editing photos on your phone and don't want to use your phones built-in photo app for editing, Photoshop Express is a free app that will allow you to adjust your images much like the full version of Photoshop, but much less intimidating. If you sign up for a free Adobe Creative Cloud account, you can unlock even more filters and features.
Exposure: To edit your exposure on the computer version of Photoshop, use the Curves tool, which tells your computer what is true white or true black in your photo and adjust all other colors accordingly. Learn to use the Curves tool from Adobe here. On your phone, under adjustments, use the light tools to fine tune your exposure, contrast, highlights and more.
Color Correction: To adjust a photo that appears to have a color cast over it, or your purples aren't appearing quite right, use the Color Balance tool. Adjust one to all 3 of the sliders until your colors balance out, giving your photo a "color neutral" look. On your phone under adjustments, use the color tools to fine tune your temperature.
Lightroom
Lightroom is another app by Adobe. While it helps you organize your photos, it also has some powerful tools to help you edit them as well. Lightroom also has a bunch of presets that you can use to add effects to your photos.
You can get Lightroom for your smartphone too! In fact, you can even use it to take photos in, which can be especially handy for Android phones, giving you more fine controls--but see my blog post on camera options for more.
Exposure: You can use the auto or manual brightness adjustment to correct the exposure in your photos. Learn how to use either option from Adobe here.
Color Correction: Lightroom offers some great color correction tools that will adjust for the cast a photo appears as. To learn how to adjust color on your computer check out this helpful tutorial and for your phone, check out this one.
Bonus
Another app that you can use on a computer or mobile device is Canva. This has some limited photo editing tools, but it is great for helping you design graphics to share on social media or insert a watermark.
If you want pick up your own Replica Surfaces to take your project photos on, I have a special link you can shop that will give you a 15% discount! When you shop this link, I also get a small commission from the sale, which helps me continue to provide you amazing tutorials and information, just like this blog post!
I hope you enjoyed all these tips and can put some or all of them to good use! Happy Crafting!
Adrienne
Shop Some of the Scrapbook Supply Items in my Photos:
Reneabouquets:
Tiny Treasures Tranquil Glitter Glass Premium Paper Dragonflies
Printed Beautiful Board Small Magical Hummingbirds Chipboard
Beautiful Board Marquise Elements Laser Cut Chipboard
White Wide Floral Embroidered Lace
Drop Leaf Lace
Plum Roses And Leaves Mulberry Paper Flower Set
Mini Plum Mulberry Paper Roses & Leaves Set
1 Ounce Beautiful Beads Designer Glass Fairy Opal
2 Ounce Hand Tinted Dark Purple Gawdie Girl Chunky Glitter Glass
Scrapbook.com:
I am an affiliate with Scrapbook.com. When you shop the links below, I receive a small commission from the affiliate, at no additional cost to you. This helps me balance the costs of the time and love I put into my projects and blog so I can continue to share my ideas with you for FREE. If you shop the links, thank you! I greatly appreciate it.









0 comments
I'd love to hear your thoughts!