
Tim Holtz Sizzix Halloween 2021: Wicked Pumpkin Vignette
Let's travel to long forgotten cemeteries together, shall we?

Happy Tim Holtz Sizzix Halloween 2021 Release Day! Scrapbook.com sent me a couple of the new dies to create with and I had so much fun creating! If you've been following my blog for a while, you know that Halloween is my favorite holiday and I love making vignettes and mixed media projects to display all over my home.
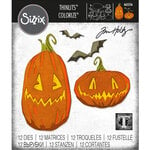
Today I'm sharing this wicked pumpkin vignette with you, featuring the new Pumpkin Patch Colorize die from Tim and Sizzix. I like to think of this little guy as standing guard near the entrance of an old, bat-infested cemetery with long forgotten loved ones. But enough with my wild imagination, let's get into the tutorial!

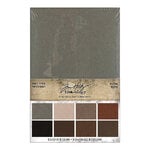
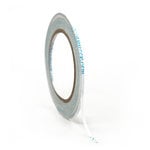
I started out by cutting all of my dies, including the large pumpkin and bats from the Pumpkin Patch set. I also cut the bat from The Count Colorize set as well, just to have another size bat. I used a sheet of vellum, papers from the Abandoned paper stash as well as Tim's Kraft Stock from the warms and neutrals packs, plus sheets from the Scrapbook.com A2 Neutrals and Harvest smooth cardstock pads to create all the different elements. (Pro Tip: If your kraft stock is curling from being in the package, use the new Scrapbook.com 4 inch mint tape to hold it down on your cutting pad. This will help you place your dies with minimal fussing. I also used the 1 inch mint tape to keep my dies in place, especially when running through multiple dies.)

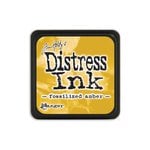
I added a little shading to the bats and pumpkin pieces with a blending brush and Distress Ink in Hickory Smoke. I also added Distress Ink in Fossilized Amber to the vellum with a domed foam blending tool so the pumpkin would have a warm glow emanating from him. I then glued all the die cut pieces together with Collage Medium.
I used the largest of the set of 4 vignette boxes, measuring the back, inside and sides on the outside of the box. I cut papers from the Abandoned stash to fit and adhered them with Collage Medium, burnishing it to the wood with a craft scraper and bone folding tool.

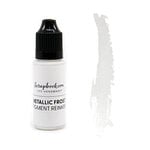
I splattered the inside of the box with some Frost ink from the re-inker that I watered down. I set this aside to dry while working on the next part. I broke a few small twigs until I had 5 small pieces. I used a dollop of hot glue to add the twigs and some moss inside a grave relic that I still had leftover from the 2020 Idea-ology Halloween collection. (If you don't have one of these, a Tim Holtz thimble would work, or you can hide this behind a tombstone die cut.) It's important to not fan the sticks out too wide or it can cause issues with placement later on in the vignette box. I even added a small patch of moss to the bottom of the vase. I bent the wings of a small bat and medium bat then used a teeny-tiny drop of glue to adhere them to the twigs in my "dead floral arrangement."

Next I drilled a hole in the back of my box with my Dremel tool to string some Tiny Lights through. I cut my tiny lights set down to 6 bulbs and strung it inside the box. I used some tiny pieces of dark washi tape to hold the light string in place in strategic spots. I then used some hot glue to add moss to the bottom of the box, just going along the back edge to hide some of the light string. Then I hot glued the grave relic floral arrangement to the the bottom of the box as far left as I could get it.

Now that the inside of the box was complete, it was time to start decorating the outside. I cut down a sheet of the new Scrapbook.com Acetate to fit the front of the box. I placed it over the top of the box without glueing it down, as well as placing the pumpkin to the right side without glueing it down. I used this as a guide to carefully apply the new Scrapbook.com Pops of Color in Silver Glitter (which will be available soon) to the acetate to create a few more sparkly stars. I carefully removed the pumpkin and set him aside then removed and set the acetate aside to dry on a flat surface.

While the Pops of Color was drying, I applied some 1/8 inch double sided adhesive to the front edges of the box. This will hold the acetate in place later. I also prepped the pumpkin to adhere to my project by placing some 1 inch and 1/4 inch foam adhesive on the back. I set these aside and created a box for the light battery pack using the tutorial from Tami B. I glued the box to the back of the box and placed the battery pack inside.

Once the Pops of Color were dry, I peeled up the lining on my double sided adhesive and lined up the acetate, using a bone folding tool to burnish it into the adhesive tape. I added some washi tape to the edges to cover the tape. I then peeled the backing off the foam adhesive and added my pumpkin. I added a quote chip from the 2020 Idea-ology Halloween release with some hardware heads distressed with Rusty Hinge Distress Paint. To finish it all off, I bent the wings on a large and small bat and glued them to the acetate with a tiny drop of Collage Medium.
And voilà! A wicked little pumpkin vignette with a spooky, distant backdrop! Until next time, happy crafting!
Adrienne
Shop the Supplies:
I am an affiliate with Scrapbook.com. When you shop the links below, I receive a small commission from the affiliate, at no additional cost to you. This helps me balance the costs of the time and love I put into my projects and blog so I can continue to share my ideas with you for FREE. If you shop the links, thank you! I greatly appreciate it.
Below are some of the products that I used.


0 comments
I'd love to hear your thoughts!