
Simple Cards 3 Ways with the Magic Mat
Real talk here: I absolutely love the Magic Mat from Scrapbook.com!

I bought the extended size Magic Mat back in early November 2020 when it was first released and you can see that my mat is well loved. I've never not used it for die cutting since the day I received it in my happy mail package and that is because I get clean cuts each and every time!
But it's not just about the gorgeous cuts that I get each time I use it. It's a pretty thrifty product! And you know I love a good thrifty product. There are three things that make this product super thrifty. The first is that it is self healing so you can use it a gazillion times like me and STILL get perfect cuts every time!

The second is that the Magic Mat extends the life of your plastic cutting pads. Your sandwich will vary from machine to machine, but the Magic Mat replaces one of your plastic cutting pads. The day I started using my Magic Mat, I spend a brand new pair of cutting pads and I have been using the SAME cutting pads for the past 4 months and I've had zero warping!
The third thing that makes the Magic Mat thrifty is that it is made from recycled materials! In my scrap room, thinking about the earth is key. I throw all my paper scraps in the recycling bin and save packaging to use in mixed media projects. So not only am I wasting less plastic cutting pads, but the Magic Mat itself is made from recycled materials. I say that is a win-win for the environment!

Now that I have sung my genuine praises of the Magic Mat, let's take a look at 3 simple cards you can make with die cuts using your Magic Mat!

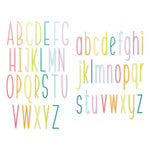
My first card is a fun rainbow themed card. The Magic Mat makes it super easy to cut out even the most intricate or thin dies, like Scrapbook.com's Tall Skinny Alpha dies. So I used the Warms A2 pad to cut out the letters and and then the Warms and Sherbet A2 pads to cut out the rainbow from the Rainbow Wishes set.
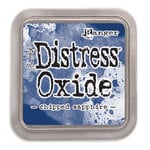
Next I stamped out a partial sentiment using Tim Holtz's Distress Oxide ink in Chipped Sapphire and cut it out using the banner die from the Rainbow Wishes set. I then cut off one quarter inch on each edge of a dark blue sheet from the Boho A2 pad and added stenciled stars with the Mod Asterisk stencil and Frost metallic ink, dabbing the ink on with a domed foam blender tool.

All that was left was to glue all my elements down onto my card. I used the 1/4" roll adhesive to glue the blue mat onto a Solar White A2 scored card. To glue down the die cut "magic" letters, I used Smart Glue. For the rainbow, I used Smart Glue to glue down my layers and then used double sided foam squares to adhere the rainbow onto the card front. To add a bit more bling, I added two gems.

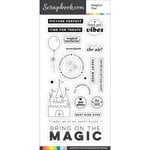
When I cut the letters "magic" I purposefully cut it in such a way that I could use the negative for a second card. This card is even more simple than the first, but doesn't skimp on the fun! I decided to turn this into a shaker card, but before getting to the fun sequins, I wanted to add a bit more of a sentiment to the front of the card. I masked off the bottom portion of a stamp from the Magical Day set using Mint Tape and then inked the stamp with Distress Oxide in Chipped Sapphire, stamping it near the top of the card front. (Be sure to dry your Distress Oxide ink before moving on or you'll smear it!)
Next I covered the die cut opening with acetate, using Smart Glue on the back side of the card front and pressing the acetate firmly in place. Then I used the 1 inch foam adhesive roll to create a well for the sequins, added my sequins and glued a backing on of a dark blue from the A2 Boho pad. Then I used the 1/4" adhesive roll to adhere the blue backing onto a Solar White scored A2 card.

To finish off this card, I added a few sentiment stickers, adhering them with double sided foam squares for a bit of extra dimension, and then topped it off with some gems for a bit more bling!

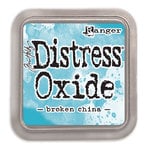
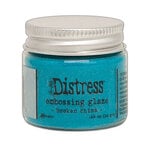
The first two cards were modern in style but this third card is a bit more distressed and vintage styled. I started by trimming down a quarter inch on each edge of a Solar White A2 flat card front then inking the entire surface with Distress Oxide in Broken China. I then used a heat tool to dry the ink. Next, I placed a whole bunch of letter and number stamps from the Bold Caps Outline set onto a large stamping block and stamped it onto the background with a clear watermark ink. I then embossed it with Distress Glaze in Broken China for a tone on tone look. Because this had a vintage feel, I wasn't concerned about how well the image stamped or even if excess embossing glaze stuck tot he card in spots. To add a bit more of a distressed feel, I spritzed the background with water and then dabbed the excess moisture off with a paper towel.
Next I cut some orange boarders out using the Tim Holtz Deckle Trimmer and then added a layer of bright pink by tearing the strips for even more texture. I adhered these down with the 1/4" roll adhesive. Finally, I cut out the word "inspire" from the Inspirational Life Sentiments die set from a bright orange cardstock in the Warms A2 pad and glued it on using Smart Glue.

I hope you really enjoyed these 3 simple cards! If you are a serious die cutter, I highly recommend getting yourself a Magic Mat (if you haven't already)! It's a serious game changer. I'm no longer wasting cardstock or paper on imperfect cuts and my plastic cutting pads will last so much longer thanks to the self-healing "squishiness" of the mat that keeps your plates from warping.
Happy Crafting!
Adrienne
I am an affiliate with Scrapbook.com. When you shop the links below, I receive a small commission from the affiliate, at no additional cost to you. This helps me balance the costs of the time and love I put into my projects and blog so I can continue to share my ideas with you for FREE. If you shop the links, thank you! I greatly appreciate it.
Below are some of the products that I used on these three cards.


0 comments
I'd love to hear your thoughts!