
My Top 10 Favorite Scrapbooking Tools You Should Invest In
I love a good top 10 list almost as much as I love scrapbooking. Maybe it's the social media manager aspect of my life that has me so in love with lists like this. Today I thought I'd combine two of my favorite things with a top 10 list of my favorite scrapbooking tools!

Note: This blog is not sponsored, but I am affiliated with Scrapbook.com. If you choose to purchase from some of the link provided, I will receive a small commission at no extra cost to you. This allows me to continue providing you with my best tips and inspiration for FREE!

With that in mind, you certainly don't need to have every single tool on my list in order to create amazing projects! Each tool has a purpose and if you don't need it, you don't need it. But I hope that this list will give you some ideas as well as help you make a decision about what tools you need in your crafting life.

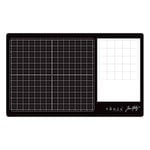
The Tim Holtz glass media mat is a game changer. When you blend your inks on it, the inks are so smooth and gorgeous. It has a white palette directly on it, making it easy to see your colors and clean up of inks and watercolors is a breeze. The removable non-stick craft mat is perfect for messy art mediums, is washable and you can buy replacements. The grid on the mat is also great for measuring and the black background is unobtrusive. I won't create any of my projects on anything else these days. It was literally my best purchase ever.

 |
| This card was created using the Glass Media Mat and the Tim Holtz Distress Blending Brushes to create a seamless and smooth ombre look. |
02 | Silhouette Cameo
I own both a Silhouette Cameo and a Cricut Air. Out of the two, I definitely prefer the Silhouette Cameo. Both the tools cut the same, so for me, the choice was because the software is much more user friendly. Plus, you have more control over your layers (like what is on each layer) and the cutting process. I really enjoy that with the digital die cut machines you can download die cut files on demand and use them right away. I also love that you can resize the die cut to whatever size you need.
I own both a Silhouette Cameo and a Cricut Air. Out of the two, I definitely prefer the Silhouette Cameo. Both the tools cut the same, so for me, the choice was because the software is much more user friendly. Plus, you have more control over your layers (like what is on each layer) and the cutting process. I really enjoy that with the digital die cut machines you can download die cut files on demand and use them right away. I also love that you can resize the die cut to whatever size you need.

 |
| For this layout, I used my Silhouette Cameo to size and cut the guitar die cut. I added thread strings to give it a realistic look. |
03 | Tim Holtz Vagabond
Because this machine uses metal dies, you can't resize the dies. Instead what you get is the ability to crisply cut extremely detailed and delicate dies. When using steel rule dies, you can also cut thick chipboard and even fabric. This machine will also accept embossing folders--I love using Tim's 3D embossing folders!
Because this machine uses metal dies, you can't resize the dies. Instead what you get is the ability to crisply cut extremely detailed and delicate dies. When using steel rule dies, you can also cut thick chipboard and even fabric. This machine will also accept embossing folders--I love using Tim's 3D embossing folders!

 |
| The delicate vine and leaf dies as well as the gold butterflies and doily dies were all cut with the Vagabond. |
This typewriter was designed to except papers up to 12" wide--something basic typewriters don't do. This makes it easy to type journaling directly onto your page. The Typecast also has the option to switch between black and colored ink on one ribbon. And there are plenty of different colors to choose from, including blue, white and silver! You can also use this machine to type up sentiments inside of cards or use with your planners.

 |
| Before adding all of the other elements onto the page, I started by using the Typecast typewriter to add the journaling directly on to this 12x12 piece of white cardstock. |
There are quite a few options for adding pretty foil details to your projects, but Heidi Swapp's Minc is by far my favorite. The heat application ensures that your foil stays adhered to your project. I know what you are thinking, foiled projects are gaudy and not my style. Here is where you are wrong: there are so many creative ways to add foil to your projects that you can even create a vintage or shabby look with it! To start, Heidi has some great options for getting that foil look including pre-made embellishments with toner ink. All you have to do is choose your foil and send it through the machine. But recently, I'm most obsessed with her toner stamping ink. If you didn't see the Instagram live she did with Tim Holtz, you are missing out. And Tim proved you can get that distressed, even grungy look, with both of their products combined! If that versatility doesn't sell you on the Minc, I don't know what will! (Even Heidi's mind was blown by some of the new techniques Tim cam up with.)

 |
| To create the background on this layout, I applied the Minc Reactive Screen Ink through a stencil. I let that dry and then ran it through the Minc with rose gold foil. This created a painted on look that better matched the shabby chic vibe of this wedding album. |
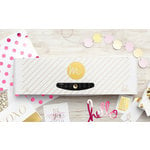
Hand stitching is great but also time consuming. And there is something about stitching on a little border to your layouts that is so appealing. That is why I love my Stitch Happy mixed media sewing machine. This machine was built to handle papers and cardstock. And unlike regular sewing machines, there is a little compartment below the sewing plate that you can empty out all the teeny tiny paper punches out of, keeping your machine from getting clogged up. This machine is also lightweight enough that you can move it around your craft room, in case you want to display it on a shelf or something.

 |
| To "frame" these lovely photos of the bride and groom with their families, I used my Stitch Happy sewing machine to sew borders of gold thread. |
These tiny scissors are perfect for fussy cutting, which I do a lot of, incidentally. These non-stick titanium steel blades are perfect for any messy crafts and the serrated edge on one side sharpens the scissors as you use them, keeping them nice and sharp. And the soft handles make them perfect for any sized hands and comfortable if you have chronic pain, like I do. If you want to cut thicker materials, try Tim's 7" snips or 9" scissors--they have all the same wonderful qualities. But the tiny 5" snips were the first pair I bought and are still my favorite and most-used size.

 |
| To create this bohemian floral layout, I used my Mini Snips to fussy cut out all of the floral ephemera, then layered them to create a lush look. |
I know, I know, yet another Tim Holtz product! The guy is literally a genius, but I swear this is the last Tim Holtz tool on the list. There are a lot of blending brushes on the market but there are a few reasons why I chose these brushes over all the other options. First, all the other ink blending brushes on the market do not have caps on them. I like to keep my supplies neat and organized and because I have a Create Room Workbox, I like to hide away all of my supplies. Because these have caps, that means I won't be getting ink all over my storage container. (Speaking of, I just got the Distress Mini Ink storage tin which perfectly fits these brushes and omg!) Second, the natural bristles don't soak up all the ink you apply to them, allowing you to use more of your product on your projects and you don't have to re-ink as often. And lastly, I love the control you have with the telescoping neck. By moving this up and down, you can have soft and loose bristles or compact and tight bristles, giving you two different application styles in one brush!
 |
| For a smooth blend, use these brushes in conjunction with the Tim Holtz Glass Media Mat. Check out the example above to see the smooth ombre blend I achieved on the fish themed birthday card. |
If you buy a Vagabond or any other metal die cutting machine, you will want a die brush, especially if you are cutting detailed dies. The foam pad and brush make it easy to punch out all the fiddly bits with a few rolls of the brush. It's much faster and easier than poking each cut out one at a time. And the bonus magnet at the other end of the brush is perfect for picking up your metal dies. I've used it a few times to find tiny metal dies I dropped on the floor too!
 |
| When I decided to create these baby shower invitations, I didn't want to poke out all the negative cuts out one by one on all 40 invitations. So I purchased this Die Brush just for this job and I can honestly say it has come in handy for projects large and small! |
10 | Finnabair 1" Silicone Brush
If you love adding mixed media art mediums to your layouts, or you just love doing mixed media projects, this is a handy little brush to have. The silicone applicator is flexible, making it easy to apply your mediums, and it is effortless to clean. The smaller size fits into a variety of jars for scooping out your mediums. If you want to cover a larger area faster, try the 2" version.

 |
| I used the 1" Silicone Brush to apply modeling paste through a stencil and to also brush on the crackle paste on this mixed media canvas project. |
Purchase One of My Top 10
Ready to make a purchase of one of these amazing tools? I've included a handy link to each one on my list so you don't have to go searching for them!
Ready to make a purchase of one of these amazing tools? I've included a handy link to each one on my list so you don't have to go searching for them!
I am an affiliate with Scrapbook.com. When you shop the links below, I receive a small commission from the affiliate, at no additional cost to you. This helps me balance the costs of the time and love I put into my projects and blog so I can continue to share my ideas with you for FREE. If you shop the links, thank you! I greatly appreciate it.
 |
 |
 |
 |
 |
 |
 |
 |
 |
 |
Some Runner Up Tools
These didn't make it into my top 10 but I still love these tools.
- WeR Swivel Craft Knife: I use this swivel knife to help with fussy cutting areas that I can't get to with scissors. Don't forget to use it with a self-healing craft mat!
- Ranger Heat It Craft Tool: This tool is perfect for drying your layers of Distress Inks and Distress Oxides or using with Tim's new Distress Glazes!
- WeR Crop-A-Dile Big Bite: This handy tool punches two sizes and can set multiples sizes of grommets/eyelets!
- WeR Magnetic Staple Board: Staple anywhere on your projects with this great tool. Choose from three sizes of staples and multiple staple colors to add fun flair to your projects.
- iCraft Adhesive Pick-Up Square: Have you ever accidentally gotten glue tape runner somewhere you didn't mean to? No worries! This little eraser really does pick up that sticky mess, wether it is on your project or on your crafting surface.
 |
 |
 |
 |
 |
I hope this list has helped you figure out whether you should buy that tool you've been eyeing for a while, or even just inspired you to try a new technique!
Happy Scrapping,
Adrienne


0 comments
I'd love to hear your thoughts!