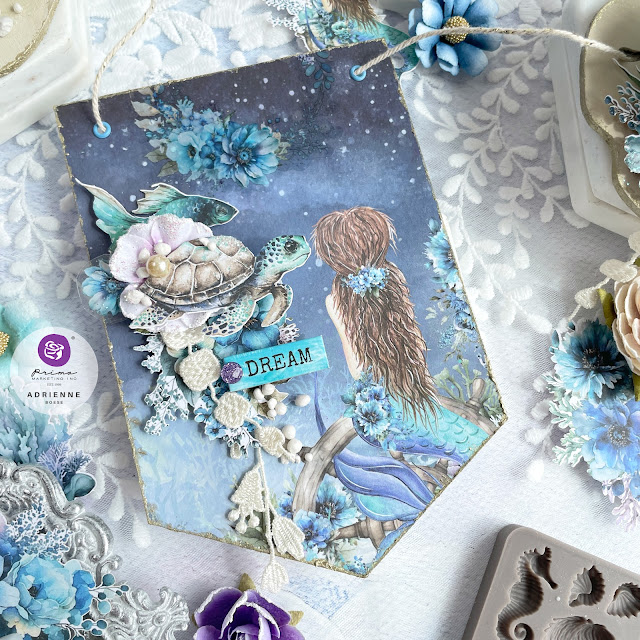
Under the Sea DIY Garland
Have coastal theme house decor? Or maybe your child is having a mermaid themed birthday party? Either way, this DIY garland is perfect to decorate with!
Hi, crafty friend! My sister has a coastal themed house and her daughter just chose a mermaid/beach themed birthday party this year, so I of course had to use A Mermaid's Tale from Prima Marketing to make some party decor!
I wanted to create a gorgeous banner that could not only serve as party decor, but could be something my sister would want to hang up in her house year-round. So I didn't add any "happy birthday" sentiments to this banner garland. Instead, I relied on using the sweet chipboard sentiments that come with this collection.
You can shop all of the supplies used at the bottom of this post!
I have 10 pennants in this banner, alternating wooden sand dollar shapes with paper banners cut from the 6x6 paper pad. And each pennant has a wonderful cluster of ephemera, resin moulds and of course, pretty Prima flowers!
So let's get right into this tutorial!
I cast my moulds in resin, using the mould from A Mermaid's Tale collection and the Redesign with Prima Kacha Majestic Flourish Mould (it reminds me of an ocean wave). I primed all of my resin casts and the wooden sand dollar shapes with Finn's Clear Gesso. The reason I went with the clear gesso was because I wanted the wood grain to peek through just a bit on the sand dollars, and this gesso is a bit thinner, so it covers moulds really easily.
Once the gesso was dry, I painted the wooden sand dollar shapes with Finn's Impasto in linen. I thinned the paint down a touch to allow that wood grain to peek through a bit.
I then spent time painting the A Mermaid's Tale moulds with Art Philosophy watercolors from the Essence and Pastel Dreams sets. Once dry, I highlighted the texture by dry brushing the moulds with a small touch of Finn's Matte Old White Wax on the elements like the anchor or ships wheel, but used the Metallique Celestial Wax on the sea horses and the mermaid to make them more magical!
I covered the flourish moulds with Finnabair's Metallique Waxes in Sea Glass, Midnight and Heather Hills. I did an ombre effect with these, using Finn's Stenciling Brushes to apply the wax, getting a good dose of each color on there, then swirling the colors together where they meet to create that gradient.
For the paper banners, I chose some 6x6 papers from A Mermaid's Tale collection. I cut the top strip off so they were each 6 inches tall, then trimmed them to 4 inches wide. I created some pointed banners, and some notched banners. I punched some holes in the top corners of each banner and added some metal eyelets.
If you have the Sizzix Scoring Board and Trimmer Tool, it's super easy to cut on a diagonal to create these banners. I've got the settings for your cuts below.
Pointed Banner:
- Set the rotating ruler to 30 degrees.
- Place the top edge of the banner at 7 3/8 inches and cut.
- Flip your banner over and cut again to create a point.
Notched Banner
- Set the rotating ruler to 30 degrees.
- Place the top edge of the banner at 6 3/16 inches.
- Starting from the outer corner, cut in to the center of the banner (to about the 1 1/2 inch man on the clear ruler).
- Flip your banner over and cut again to create a notch.
After the banners were all cut, I used a sponge to apply a bit of the White Gold Icing Paste to the edges of the paper banners and the outside edge of the sand dollars. If you don't have this pate, you can use one of Finn's gold waxes to get a similar effect.
I then chose a flower, ephemera, Sticker Roll stickers, and a chipboard sentiment sticker for each banner piece. I also tucked some lace into each cluster. Each wooden sand dollar also got some moulds. I used the flourishes on the first and last sand dollars.
I also added the "A Mermaid's Tale" mould cast on the center paper banner. I applied some of the clear stickers directly to the paper pennants, but mostly I applied them to a thick clear acetate and fussy cut those out to add into the floral cluster so the element would "float" above the base.
I used hot glue and foam adhesive to layer on my elements to each banner. Once the floral and ephemera clusters were attached, I added some Art Stones, glitter, crystals and Memory Hardware Pearls to each pennant. Then all that is left is to string your pennants onto some twine and hang it!
I hope that you enjoyed this fun tutorial and that it inspires you to make something beautiful for your home or next party. And until next time, happy crafting!
Adrienne
Shop the Supplies:
Scrapbook.com, A Cherry On Top, Spellbinders, Sizzix & Amazon
I am an affiliate with multiple companies. When you shop the links below, I receive a small commission from the affiliate, at no additional cost to you. This helps me balance the costs of the time and love I put into my projects and blog so I can continue to share my ideas with you for FREE. If you shop the links, thank you! I greatly appreciate it.
You can also use the code adrienne15 for 15% off your order on the Prima Marketing Retail site.
Below are products that I used for this project.


0 comments
I'd love to hear your thoughts!