Christmas is in the air and Prima Marketing has a new collection inspired by the Christmas Markets found all over Europe!
Growing up, I always heard stories from my Austrian Oma (grandmother) about the Christkindlmark, or Christmas Market. Stalls at the market are filled with backed goods and homemade Christmas décor, especially glass Christmas tree ornaments.
For the release of the Frank Garcia Prima Marketing
Christmas Market collection, I wanted to create my own little Christmas ornament. I was inspired by the pastel hues reminiscent of a Victorian-era Christmas, with delicate lace, ephemera, golden accents and snowy poinsettias.
I used the Vintage Bauble #1 MDF shape from The Mixed Palette as my base. I traced the shape of the ornament out on the
A Sleigh Ride patterned paper. The green background with white stars reminded me of the pattern found on so many vintage ornaments!
I also traced out just the top on white cardstock to make the clasp at the top of the ornament a separate layer. I drew in the bottom with scallops once tracing out the outline, cut it out and then traced this shape a second time. I wanted at least two layers of cardstock for this to make it sturdy and thick enough to be covered in a medium without curling. I glued these two layers together then covered it in Finnabair's Jewel Paste in
Golden Dust. Once it was dry, I glued it in place on the ornament base.
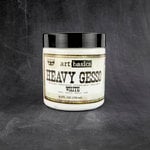
Next I painted a resin cast of the Prima Marketing Iron Orchid Large Flourish mould with White Gesso. After the gesso was dry, I then painted it with the Impasto Paint in
Victorian Green. The next layer was highlighting the raised areas with Opal Magic Wax in
Green Brocade.
I adhered this flourish to the ornament base with
Heavy Body Gel. For some texture, I dabbed
White Crackle Paste on the edge of the MDF shape and in a few spots on the top as well.
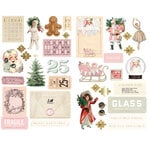
I love the large white
lace that comes with this new collection. It's a floral snowflake! On one end of the trim, I had a half a snowflake, so I cut those pieces apart to use just one arm of the snowflake as an accent tucked in amongst the flowers. I also cut one full piece off that would be layered under the green poinsettia flower from the
Christmas Joy set.
I also wanted to add some additional gold accents. I covered some white cardstock in some double-sided adhesive and then sprinkled on Finnabair's
Gold Metallic Flakes, burnishing them to the adhesive. I then die cut out some outlines of poinsettia leaves from the Tim Holtz Seasonal Sketch die. I think this gave a wonderfully ethereal, golden touch to the project and this is a great way to use your metallic flakes in a fun way!
The last item of prepping embellishments was to trim off the white halo around the
ice skates ephemera piece. Once this was done, I layered
flowers, tucking the golden leaves and lace in. The crowning piece of the flower cluster was the full lace snowflake, followed by a nest of sisal fibers and the green poinsettia flower.
Before adding the
chipboard sentiment and ice skates ephemera, I dabbed on Finnabair's
Snowflake Paste all over the project to add sparkle and texture. I also covered the edges of the chipboard sticker sentiment with the snowflake paste as well then glued the chipboard sticker sentiment on and tucked in the ice skates ephemera.
I added a few
puffy stickers to the flower cluster. I like the pink wax seal puffy stickers and thought they would just add a little something extra to the project. I also added some of the gems from the
Say It In Crystals set from the collection. Then I popped some of the star ephemera on to the green and white star background using some foam adhesive.
The last detail was tying off a bow with the pink ribbon from the collection and adding it to top of the ornament!
I hope that you love this project as much as I do and that it inspires you to make your own magical Christmas décor using the new
Christmas Market collection!
Until next time, happy crafting!
Adrienne
Shop the Supplies:
Scrapbook.com
I am an affiliate with Scrapbook.com. When you shop the links below, I receive a small commission from the affiliate, at no additional cost to you. This helps me balance the costs of the time and love I put into my projects and blog so I can continue to share my ideas with you for FREE. If you shop the links, thank you! I greatly appreciate it.
Below are products that I used or similar products.
Amazon
I am an affiliate with Amazon. When you shop the links below, I receive a small commission from the affiliate, at no additional cost to you. This helps me balance the costs of the time and love I put into my projects and blog so I can continue to share my ideas with you for FREE. If you shop the links, thank you! I greatly appreciate it.
Below are products that I used or similar products.


No comments:
Post a Comment
I'd love to hear your thoughts!